A prototype is the bridge between a concept and a working product. Whether you're refining a design or testing market fit, knowing how to create a prototype ensures your idea can be built, tested, and improved with confidence. This guide walks you through each step — from sketch to working model — to help you build a prototype that actually works.
Before building anything, make sure you truly understand what you're building — and why. That might sound obvious, but rushing into prototyping without a validated concept leads to wasted resources and circular redesigns.
Start by asking foundational questions: What problem is your product solving? Who will use it, and in what environment? At this point, you don't need exact dimensions, but you do need a clear idea of form, function, and user expectations.
Sketch your ideas — on paper, with basic CAD, or using UI mockups if the product has an interface. Early-stage drawings should be loose and flexible, not polished. The goal is to externalize ideas and spot gaps before diving into the physical model.
Concept clarity also helps define what kind of prototype you'll eventually need — appearance-focused, function-first, or a combination of both.
Not all prototypes are created equal. Depending on your goal, you'll need to choose between several prototyping approaches.
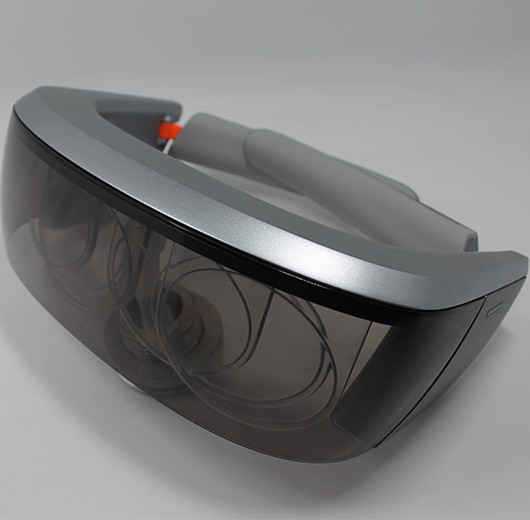
If you're presenting to investors or stakeholders, a visual or appearance prototype may suffice. This version doesn't need to function — it just needs to look convincing. For internal engineering validation, however, you'll need a fully functional prototype that can withstand stress, fit testing, or environmental exposure.
At this stage, you should decide whether to build in-house or outsource. In-house methods like 3D printing or foam modeling work well for quick internal reviews. But if you're aiming for functional testing or production-grade accuracy, professional options like CNC machining or injection mold simulation offer far more reliability.
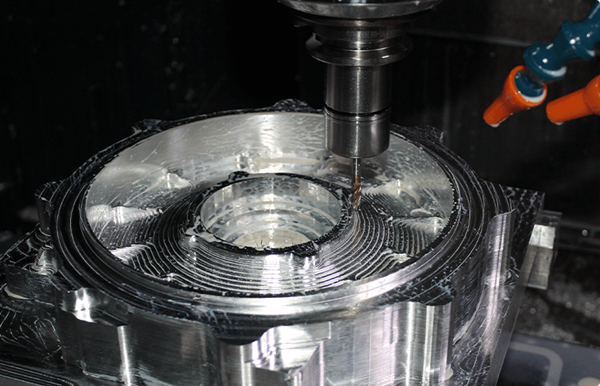
This is where a CNC prototyping service becomes valuable. CNC allows for high-precision prototypes that mirror real-world tolerances and surface quality, especially for mechanical or industrial applications. Compared to additive methods, CNC also enables more material options, including aluminum, stainless steel, and engineering plastics.
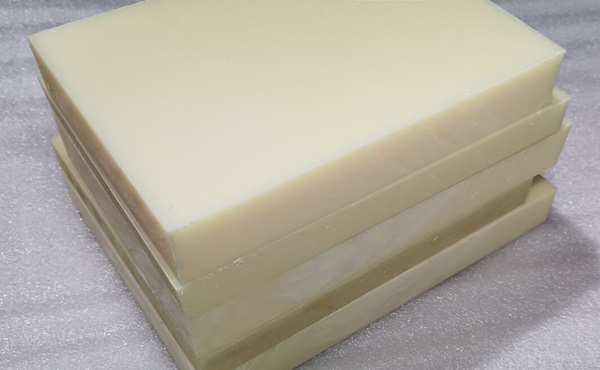
Material choice can make or break your prototype. The decision depends on the purpose of the prototype, how close it needs to be to the final product, and what kind of testing it will undergo.
For proof-of-concept models, low-cost plastics like ABS or PLA are often used due to affordability and fast printability. These are useful for ergonomic or design evaluations, where tactile feel matters more than structural integrity.
Functional prototypes, however, may require more durable options — aluminum for strength and heat resistance, PC for impact testing, or POM for wear-resistance in moving parts.
Also, consider the prototype's lifecycle. Will it only be used once for demonstration? Or does it need to survive multiple test cycles under real-world conditions? If you need to simulate product use, select materials with mechanical properties that resemble your intended production-grade choices.
At this stage, it's common to combine materials — for instance, a plastic enclosure paired with metal inserts — to simulate hybrid designs. The material selection phase should also involve close collaboration with your manufacturer, especially if tolerances, threading, or snap-fits are involved.
Now comes the transformation from virtual to physical. This stage typically involves CAD modeling, toolpath generation, and actual machining or printing.
Precision matters. An inaccurate prototype won't help you verify much — in fact, it can mislead your design decisions. Start by creating a detailed 3D CAD model with tight tolerances, proper draft angles, and realistic wall thicknesses. Avoid unnecessary complexity unless it serves a clear functional purpose.
Once the model is complete, choose a manufacturing process that suits both geometry and material. For intricate parts, rapid prototyping machining through CNC is ideal. It can quickly convert CAD into tangible parts with high repeatability and smooth finishes, which is essential for components like housings, brackets, or mechanical linkages.
Unlike additive-only options, CNC-based rapid prototyping machining doesn't require support structures and offers superior strength and compatibility with engineering-grade materials. It's also easier to scale later for low-volume production or pre-launch validation runs.
It's important to review the prototype after machining — not just for dimensions, but also for feel, performance, and how it fits within assemblies. Sometimes, what looks perfect in CAD fails to assemble due to a minor tolerance issue or interference fit.
Testing is where the real learning begins. A prototype only adds value if you put it through the right evaluation process. That includes mechanical testing, user feedback sessions, environmental simulations, and even packaging fit.
Don't limit testing to internal teams. Real users interacting with the prototype often reveal issues engineers might overlook — such as usability friction, misaligned expectations, or unclear product interfaces.
Use each test to identify flaws and opportunities for improvement. Then, return to the design file, make changes, and prepare for another build. This loop may feel repetitive, but it's the most effective way to validate functionality before committing to mass production.
Document everything during testing — from measurement deviations to user quotes. This data becomes crucial when justifying design changes or communicating with stakeholders.
Once the prototype performs reliably and meets your product objectives, it's time to consider production readiness. However, transitioning from prototype to mass production isn't just a scale-up — it's often a redesign.
Production requires cost-efficient material use, tooling compatibility, assembly simplification, and quality control planning. For example, injection molding requires uniform wall thickness and draft angles — things that may not have been necessary for your prototype.
At this stage, work closely with manufacturers to refine your prototype for manufacturability. This might involve changing materials, splitting assemblies, or tweaking tolerances to suit high-volume equipment.
You'll also need to begin formal engineering stages such as EVT (Engineering Validation Test), DVT (Design Validation Test), and PVT (Production Validation Test) — especially if your product is in a regulated industry or consumer electronics space.
The prototype you built isn't the final product — it's the last checkpoint before industrial scaling.
Building a functional prototype doesn't require doing everything in-house. In fact, working with experienced prototyping teams can save enormous amounts of time, cost, and design errors.
Experts can advise on manufacturability, offer feedback on design files, and even simulate production challenges early in the prototyping phase. This can prevent costly mistakes and reworks down the line.
Look for partners with multi-process capabilities — CNC machining, vacuum casting, low-volume injection molding, and post-processing options. A well-rounded partner can adapt to your design as it evolves from early concept to pre-production readiness.
Communication matters just as much as capability. Choose a service provider that's responsive, clear about lead times, and open to collaborative iteration. It's not just about output — it's about helping you make better design decisions through informed prototyping.
Creating a prototype is never just about building something quickly — it's about verifying that your product works as intended, is manufacturable, and meets user needs. Each step, from initial design to iteration, plays a critical role in minimizing risks before full-scale production.
If you're ready to turn your concept into a high-precision prototype, Dadesin provides reliable CNC prototyping, rapid machining, and expert support tailored to product developers and engineers. For inquiries or quotes, feel free to contact us at [email protected].
By continuing to use the site you agree to our privacy policy Terms and Conditions.


